The Corne Keyboard
Following on from my previous writing on the topic of mechanical keyboards and keyboard layouts, I acquired a kit to build an ergonomic split keyboard recently — the open source Corne.

This board presents some additional challenges. First, while I do type fluently with nine or ten fingers, readily at 100–120 wpm sustained, I don’t observe true home-row touch typing technique. I borrow certain fingers from the opposite hand for some keystrokes based on long habit, and this keyboard will immediately enforce complete hand-separation. Secondly, there are only 42 keys in total compared to even the Planck’s 47, and more critically the Corne’s physical arrangement includes the idea of a thumb cluster of three keys per hand. This last point bears some discussion.
One of the core concepts of touch typing is that of responsibility: a given finger on a given hand is responsible for pressing a certain specific subset of the keyboard’s keys, based on some notion of reachability. A consequence of this, given how our hands and fingers have evolved, is that most fingers have a strictly vertical arrangement of keys which they’re responsible for — with the index and pinkie fingers each having an additional column to one side, on keyboards with at least six columns per hand. This should all be familiar.
The wrinkle, though, comes with the thumb clusters. Whilst physically horizontal, conceptually they are of course in fact logically vertical, since they’re the exclusive domain of a single digit: the thumb. This fact helps us develop some guidelines for adapting a keyboard layout to this reduced number of keys with its strict physical enforcement of hand-separation, as follows.
- Since our goal with a keyboard such as this is to maintain our hand position as much as possible, and we cannot cheat by borrowing fingers from the opposite hand without extreme movement, the cardinal principle to remember is that a held key consumes its entire block of responsibility. The finger holding a key is unavailable for other duty, so due care is needed when designing layouts which use hold functions, particularly momentary layer toggles.
- Since thumb clusters are logically a column instead of a row — i.e. the column for which the thumb is responsible — it’s important to remember that a given hand’s thumb cluster keys are functionally exclusive, just as a given column of letters is. The physical layout of the thumb cluster is deceiving in this regard.
- As a direct consequence of the above points, it’s straightforward to see that, when designing a layout for a split keyboard, due attention should be paid to the input requirements for all likely combinations of modifier keys. It’s common for multiple-modifier input to be achieved with a “lift and splat” movement on a more conventional keyboard; a contortion likely to have a higher re-orientation cost here, and in any case against the principle purpose of this form factor.
- Compact keyboards have the concept of layers, whereby alternate functions are available on keys by toggling the active set, usually via a dedicated keypress or hold. With a reduced number of keys, it becomes increasingly important to consider the related concept of transparency: a key on a higher (superimposed) layer which has no particular function defined on that layer can be set as transparent, whereby it inherits the function of the layer below. In effect, the keystroke “falls through” to trigger whatever default, base-layer function is assigned to the key in the same position. This useful feature implicitly contains a caveat: don’t override a key you might need in this layer. By nature, the base layer will tend to provide alphabetical keys and a full set of common modifiers, and it’s worth thinking about how often you might combine those with ancillary functionality on temporary-use layers; a common example may be the combination of modifier keys with cursor or mouse keys.
- No matter how few physical keys you have, you’ll tend to notice gaps in your layers: areas with no key assignments at all. This is because a small keyboard with multiple layers will very quickly have more logical keys than even the largest physical keyboard. In this circumstance, there can be a temptation towards maximising utilisation, and taking advantage of as much customisation as possible. This is fine and to be encouraged, but caution is warranted in at least one specific regard: rely on transparency over duplication whenever possible. The reason for this is obvious and prosaic; key duplication, while occasionally useful, is generally at odds with the development of strong muscle-memory, which requires consistency of motion. More subtly, duplication of keys is more often a warning sign than an efficiency — before committing to it, consider how you might instead ameliorate the perceived need for it in the first place.
- A thumb-cluster keyboard will probably mark the boundary between layouts that are essentially just compressed full-size arrangements, and layouts which require significant change from what’s familiar. This is to be embraced. Consider in particular that moving to a split and/or cluster board is an opportunity to question and rectify the sub-optimal but heavily established typewriter-originated conventions that we all battle with each day. Most relevantly, make your first task be to reassess where your modifiers and whitespace keys should be, where the latter category includes Space, Enter, Backspace, and perhaps also Tab. For Space, you almost certainly use a specific hand consistently; the key should be in the corresponding thumb cluster. For the other whitespace keys, consider that a conventional and larger keyboard places all of them in the most physically awkward positions available — this need not be so. And for modifiers, consider frequency of usage: Shift is most needed, but least accessible! The remaining modifier keys’ frequencies are entirely dependent on operating system, and to some extent also type of work. Challenge and redefine these average and arbitrary conventions.
- When moving to a new and thus unfamiliar layout, remember there are other things to capitalise on: consistency, logical arrangement, personal needs, symmetry and so on. These can become the basis of a new familiarity, and will aid learning.
- Finally, if your primary motivation in changing keyboards or layouts is ergonomics, and particularly the relief of pain, keep in mind that your largest improvement can probably be made by adopting a non-QWERTY base layout. It’ll take longer to learn, but the cumulative benefits are likely to be dramatic. For a place to start, try the Colemak Mod-DH layout, which is modern, based on the very popular Colemak layout but with improvements in ergonomics for those who type primarily in English, and which benefits from Colemak’s advantage over Dvorak in having been created in the age of computational analysis of layout efficiency based on actual language usage. Another possible choice might be the Workman layout. As my own motivations don’t include the relief of discomfort when typing, I’m not currently planning to switch my base layout — but that could always change in future.
With these principles in place, and remaining ever ready to bend or break them, we can move onto a concrete example. Any particular custom keyboard layout tends to be short-lived during an initial period of intense customisation and tuning, but this layout is at least what I’m using at the moment, having made a number of changes and optimisations as I’ve discovered the need for them.
To begin, some introductory notes.
I’m a writer, and so I have a need for the punctuation on the default base layer of any keyboard to remain available. I also benefit from certain additional punctuation being more prominent than someone in a different line of work might prefer. I wrote about my needs in that regard. Keep in mind that your own particular requirements will and should differ.
I’m using the open source QMK firmware to power my boards, as many of you will be. If you’re interested in my specific keymap and functional customisations, you can find them on github here. They’ll likely have evolved since this article was written.
As you embark on learning a new layout, typing drills are of great benefit. I recommend keybr in that regard, since it adds one letter at a time depending on your ongoing performance, rather than insisting you type full words before you know where each letter actually is.
Finally, I’m typing this piece on the Corne itself, which while currently a somewhat laborious process, is the best way to help myself adjust. With that, let’s discuss my layout.
Base layer

The default and underlying layer, to which keystrokes fall through from transparent keys above. This is the layer described by the glyphs on your keycaps, if you have any (I prefer to keep them blank). See my previously-linked pieces for most of the relevant points here, including the placement of Tab and Escape, the hold functions on O and P, and my desire for a dedicated Mute function at all times.
There are four aspects of note here that are specific to this new keyboard: the thumb clusters, modifier keys, layer switching, and combos. Let’s deal with those in order.
The thumb clusters are a radical change for me. I’ve brought the Enter, Space, and Backspace keys down to my thumbs, getting rid of the awkward positions they usually occupy, and I found that I adjusted to the new locations within a few hours. It feels so much more sensible to have these critical typing keys available without pinkie-stretching or lifting my hands, and I think this change will pay increasing dividends as my comfort with the layout increases.
I’ve also completely rethought my modifiers, pulling the two most frequently required mods for iPadOS — Shift and Command — into the thumb cluster, and put the Alt/Option and Control keys into the usual positions of Shift and Enter respectively. This definitely requires adjustment, but overall it provides much improved fluidity for two core situations: using Shift with alphabetic keys or as a selection modifier, and using keyboard shortcuts which mostly require Command, perhaps also Shift, and an alphabetic key. It’s still readily possible to engage the “hyper” combination of all four regular modifier keys, but now it can be done without lifting my left hand from its home position.
Next, layer switching. I’ve opted for a new model here: a single key which cycles between each of my four layers in sequence, with each higher layer having a direct escape back to the base layer, in the position usually occupied by Escape. Additionally, I’ve created direct access momentary layer switching hold functions on X/C/V, to allow quick use of my right-hand cursors, numpad, and media controls on the corresponding higher layers, about which more later.
Lastly for this layer, my combos and superimposed functionality generally. Combos are functions triggered by the near-simultaneous pressing of several physical keys at once, and I’m experimenting with them here as a way to more quickly access both the en- and em-dash symbols which I (over-)use in my writing. Some time will tell whether these are a worthy addition to my layout. Also, and strictly a QMK “tap dance” function rather than a combo, I’ve added Caps Lock as the double-tap action on my Command key, because iPadOS 15 adds a series of global-scope keyboard shortcuts using the Globe or Fn key specific to Apple keyboards, and also allows remapping other modifiers to act as a Globe key if you’re not using an Apple keyboard at all. I never use Caps Lock for its intended function, so this setup allows me to keep all keyboard shortcuts on a single two-tier modifier, which has a pleasing consistency.
Next, let’s talk about the first of my raised layers: Navigation.
Navigation layer

The main principle evident here is that of symmetry, coupled with making affordances for dual-handed usage where advantageous. The right hand has my cursor keys cluster, because on larger keyboards my cursors have always been to the right of the keyboard. Here we make a pragmatic change, though, because instead of being in the lower-right, the cursors are under my fingers in home position. Many people would choose a single-row arrangement on J/K/L/; here, but I’ve never managed to switch from an inverted-T cursor cluster, so that’s what I’ve created here. Moving farther outwards i.e. rightwards, I have ever-increasing magnitudes of movement, with Page Up and Down, and finally Home and End.
The mouse keys live on the almost symmetrical left side, incorporating left click in the thumb cluster to allow for dragging if needed, and also a right-click in a less optimal position which avoids stealing either a modifier key or the Space bar, all of which can be useful in certain mousing contexts in various apps. I have vertical scrollwheel functions further outwards i.e. leftwards here, mimicking the magnitude concept from the other half of this layer, and finally I’ve added acceleration modifiers (hold keys) on the right half’s inner edge, to allow easy combination with the mouse controls without contortion. Note that the scrollwheel keys are inverted because iOS uses content-relative scrolling, rather than viewport-relative like a desktop computer.
In this layer as in those detailed below, modifier transparency is maintained to the maximum feasible extent. Next, my Numpad and Symbols layer.
Numpad layer
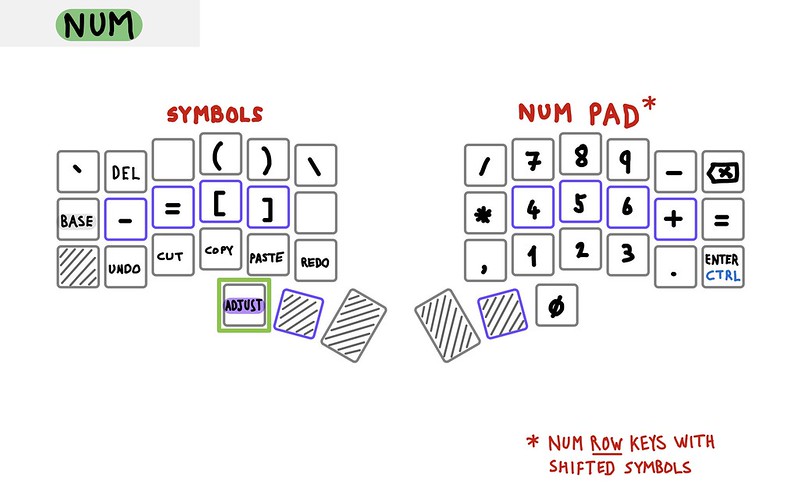
An important point to note here is that I’ve enabled QMK’s Autoshift feature for non-alphabetic keys. This means, for example, that holding down the 1 key or the semicolon key for a fifth of a second or so will instead respectively produce an exclamation mark or a colon respectively. To my mind, and my fingers, this is a huge help and entirely non-intrusive. The trigger period can of course be customised as needed.
I’ve never liked the num row at the top of keyboards. I don’t have a good feel for where each digit is, and it’s the one part of the board I often have to visually scan to orient myself. A num pad, though, is entirely different — I love those. I find it easy to accurately input streams of numbers at speed, without looking, and generally I just find it a vastly superior arrangement for the purpose. Accordingly, in this layout I’ve foregone a number row entirely.
The right half of the keyboard in this layer is my numpad, but using the numbers from a conventional num row so that I can access their shifted symbols via Autoshift. Again, I chose the right side because numpads tend to be on the right due to our species’ dominant handedness, so my right fingers are most dexterous in that capacity. I’ve added the most relevant symbols around the pad for arithmetic input, as well as a layer-specific Enter key to capitalise on muscle memory, still providing access to the Control modifier on the same key. Zero sits in its logical spatial position in the thumb cluster, overriding the usual Backspace key which remains available at the top-right.
On the left half I have my selected symbols, and in particular my paired parentheses and brackets; the former for composition, and the latter for use in common keyboard shortcuts for tab-switching and so on. I also keep a hyphen and equals pair here, again for keyboard shortcut use (they’re commonly used for resizing or zooming functions). I’ve used symmetry to add the opposing slashes at the top inner corners, keeping the arithmetic division forward-slash logically on the numpad side. Both are useful when using a terminal, as is the grave/backtick (and shifted tilde) in the upper left corner of the left half, where they’d approximately be on a full-sized keyboard.
Lastly for this layer, and experimentally for me, I’ve added a few very common keyboard shortcut hotkeys in their expected positions, with Undo on Z, Cut on X, and so on. Time will tell how much use I get from them.
Next and indeed lastly, my Adjust layer.
Adjust layer

The Adjust layer is a traditional one from certain small keyboards, usually used to change the keyboard’s own settings: to alter backlighting, prepare to receive new firmware, toggle Autoshift, and so on. My own definition of Adjust is looser, and focusses mainly on system control in the two areas of media playback and the screen.
My left hand controls media, again putting the most needed functions — those of track skipping and play/pause — under my fingers in home position, with volume controls just above. On the opposite side, I have a simple cluster of controls for screen brightness, putting the iPad to sleep, and shortcuts for both taking a full-screen screenshot, and doing the same but also immediately loading it into the Markup interface for annotation with the Apple Pencil. Finally, I keep my keyboard’s reset button here, which allows it to receive new firmware whenever I want to make a change, without having to press the physical reset buttons on the underside of each unit.
All other keys on this layer are disabled, and awaiting possible future functions I might find useful.
Areas for improvement
There are a few areas where my keymap needs some work. There’s a duplicate Backspace key in its conventional position on the Base layer which serves little purpose; the inconvenience of the position has stalled me on thinking what might be more useful there. Perhaps the dedicated Mute key, moving it off the hold function on M.
I could switch to an alternate base layer layout like Colemak-DH for reasons of pure efficiency, albeit at a high learning cost. I could also perhaps add an Escape hold function to the Base key on higher layers, since that key can be useful in many situations. Additionally, I’ve disabled the pair of small OLED screens on the keyboard because I see little use in looking at the device while typing, but I’m open to the possibility that some use might exist which isn’t redundant, frivolous, or outright counterproductive.
For the most part, though, this layout is working well and has reached a certain stability so I can train myself on it. My initial typing speed was appalling, having never learned to type on a split keyboard before, but improvement comes rapidly with practice, and the prospect of writing a moderately lengthy piece of text like this no longer prompts dread.
Closing thoughts
The experience of using a compact split keyboard, especially an ortholinear one with a grid layout of keys, is seductive. It has more of the feeling of piloting a vehicle than entering text, and it allows for a much more relaxed shoulder, elbow, and wrist posture than the inwards-then-outwards twisting needed with a keyboard that’s a single unit substantially narrower than shoulder width. I like the sense of space on my desk, and I very much like that I can choose to angle each half of the board inwards independently, to find the most comfortable and accuracy-friendly position.
I need to find a suitable carrying case for the Corne at some point, portability being one of its advantages, but for now I’m delighted with the appearance of it in my workspace, and the novel feel of having my hands so far apart when typing — at the ideal width for my chair’s arm-rests, even.
The journey of moving to smaller keyboards is that you always realise that you could survive with still-fewer keys, and you automatically start to imagine those layouts too. This will do me for a while, though, I think, since I do need to build up my typing speed a bit more.
I love this little board, and whatever the future holds in terms of ever-smaller numbers of keys, it’s my hope that this experience will make me a better, and safer, typist.
Thanks for reading.